
Skip to content
  • There are no suggestions because the search field is empty.

How to create and assign free balls products to your members / players 

In this guide, you will learn how to create and give out free balls products

The 'Free Balls' product is perfect for use for 
  • Free driving range balls for members or member groups, with limitations for use
  • Free driving range balls for Pros or staff
  • Annual Pass for the driving range 

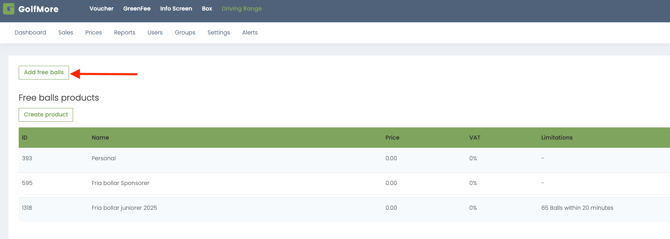
To start, go to Sales / Free Balls

First, you need to create a Free Balls product. Click 'Create Product' and you will see this screen.

Name: Here you write the name you want for the product, eg: Members Free Balls 2023, Pro, Annual Card 2023

Price
:
 If products are free (Staff, Pro), then simply write 0 here. If you want the product for sale (Annual pass) then enter the price for the product here.

VAT
:
Fill out your VAT percentage

Valid until
:
 There are 2 options here
                   a) Time period (years, months or days)
                   b) Specific date (time when the product must stop working).

Max use
Used to set various restrictions on consumption, so that, for example, members with free balls cannot simply hand out balls to guests and other friends.
                   a) number of balls within a period of time EX: 30 balls/x points within 20 minutes
                   b) number of balls within a period of time EX: 50 balls/x points within 30 minutes
                   c) Daily: number of balls or points per day EX: 200 balls/x points per day

Portal sale
:
 Where and who can buy/sell the product
                   a) No: The product is only visible to administrators/staff
                   b) Everyone: The product is visible to everyone in the GolfNext App
                   c) Only for members: The product will only be visible to members of the club.
                   d) Member groups: The product can be made visible to special groups (Voucher > Groups): Sponsors, VIP members, etc.
 
Click "Create" The product will now be listed under "Free balls products"
 

https://desk.zoho.eu/galleryDocuments/edbsned7f3dedd06d642e8fd935d32e9227f246338092fd11d13380e35362c8e8e6109bc56aef4223f301671a2da5bc1eaf6ebd8c34341f2907635de7b9fcfc812da5?inline=true

You can now assign the new product to your users. Press 'Add Free balls' at the top of the page.
You will get redirected to this page:

Free balls product: Here you can now choose between the products you have created.
Renewal: Here you can set up so that your product is automatically added to a player (monthly, quarterly, half-yearly or annually). If you choose this option the balance will be reset to the given value at each renewal (Balance is not accumulated), and there will be no end date.
Valid date to: End date on the product
Upload union members: If a product needs to be assigned to several players, this can be done at once from an Excel csv. file - this matches the 'Golf-ID' field
Upload non-union members: Same functionality, use this if you want to upload a list of emails (Matches E-mail address field)
 
You can manually enter Golf-ID or e-mail one per line, or you can do an import from a text file.
 
The import file for Union members only needs to contain the one value (Golf-ID) per player.
The import file for non-union members should at least include the e-mail, but these fields are supported: Country; Golf-ID; e-mail; First name; Last name; NFC card no. When doing the import you will be prompted to match the columns with the values:


When you import the list you will see a list of the imported users like this:

Green line means that the data is OK, if you see a red line it means that the user already has one Free Balls product, and you need to delete this import (press the red x), before you assign the product to the imported users (all lines must show green)
To finalize the import, click the 'Add Free Balls' button
 
 
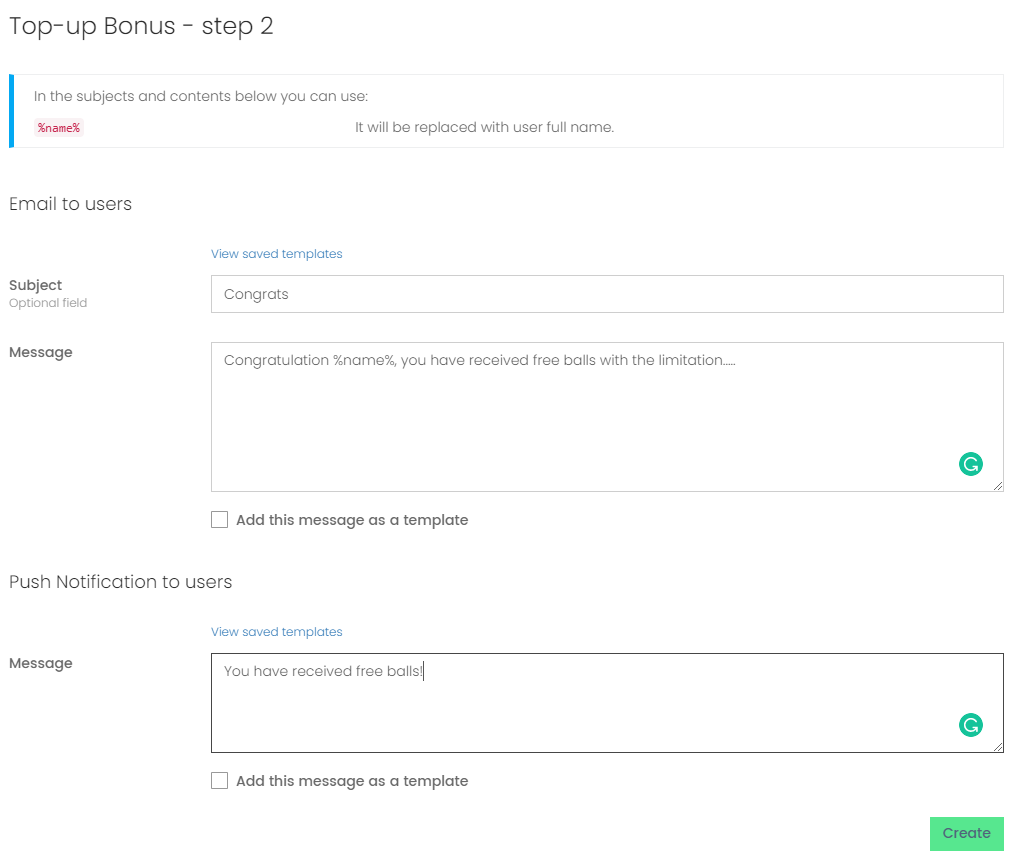
The users will receive an e-mail telling them that they were given free balls, and on the next screen you can specify the text that will be shown to them in the email. 
 

If you want to address the recipients personally, you can write "%name%" and the recipients' full name will appear there when they receive the email.

IMPORTANT: When you have to upload your members, the list must consist of a maximum of 950 members, if you have more, the list must be divided into 2 or more.

Thank you for reading - feel free to contact us in case you have any questions, suggestions or general feedback